With many methods to make coffee today, picking the right one is not always easy. It can literally make your head spin when you’re trying to find a brewing device to make your cup of coffee in the morning!
The percolator was among the first percolation brewing devices to hit the markets. Perked coffee offers a host of benefits for drinkers and the coffee percolator is a unique device that you can try out with a variety of coffee beverages.
What Is a Coffee Percolator?
Coffee percolators are unlike the traditional drip and French press coffee makers in that they circulate boiling water through the coffee grounds, rather than dripping or steeping a brew. Of course, there is more alchemy involved, but these are the basics of the percolator process.
The earliest history of the coffee percolator was from 1889, when Hanson Goodrich patented his device. His invention aimed to remove all grounds and impurities from his coffee. Although it came with a few side effects, Goodrich achieved his ambitious goal. If you make coffee using a traditional coffee percolator, you will find it is somewhat bitter and over-extracted.
These flavors by no means ruin coffee for all drinkers, however. Seasoned percolator enthusiasts insist that these not-so-nice side effects of percolation are not present in all percolations. By carefully controlling the brewing process and not over-brewing the grounds, you can create your perfect cup.
Today, people often view the percolator as the basis of modern coffee-making gadgets. The coffee percolator was the prototype for future brewing machines, such as the Moka pot and other coffee makers.
How Does a Percolator Work?
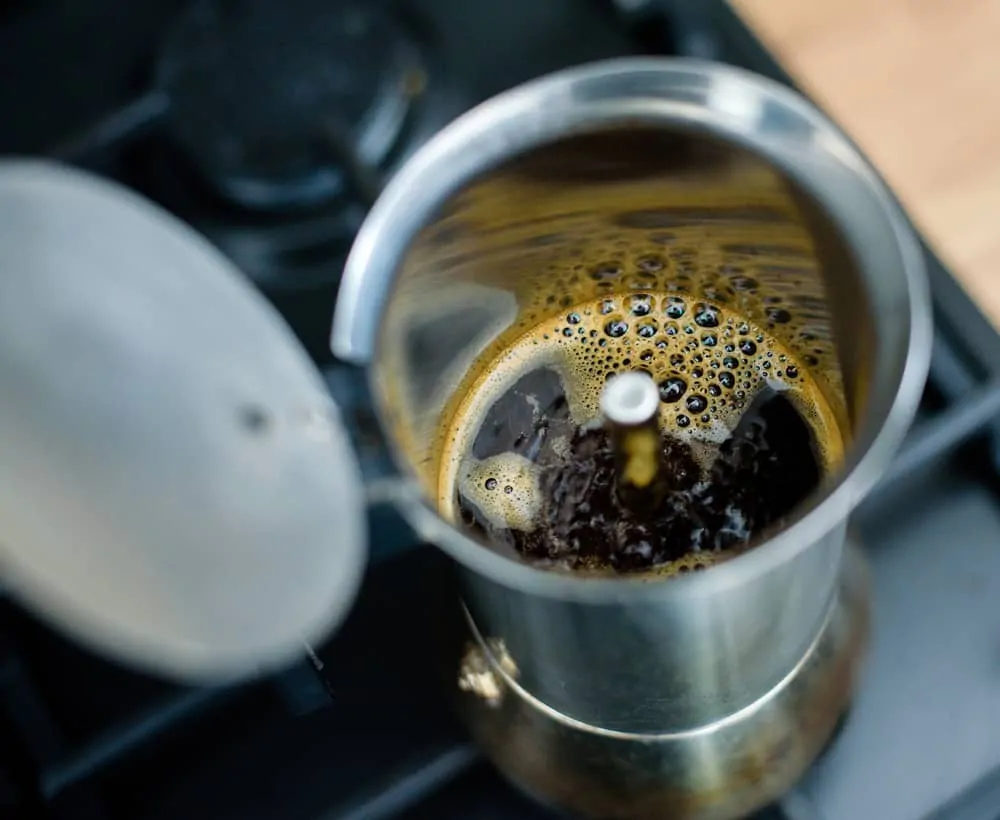
Essentially, a percolator works by using the steam from the boiling water at the bottom of the coffee pot. A mechanism makes sure that water moves up a tube, where it then sprays over a mesh spreader cover, spreading water over the ground coffee. After this, the water saturates your coffee beans, beginning the brewing.
The brewed water drops into the bottom of the pot and begins the cycle all over again. For this reason, people often describe percolator coffee as being too strong. In essence, when you use a coffee percolator, you are recycling the coffee brew and re-infusing the beverage.
Stovetop Percolator
The stovetop percolator uses heat from the heat source, in this case, a stovetop, to boil the water in the lower chamber and squirt it over the coffee grounds in the filter basket. Another way that you can think of it is as a gravity-based brewer.
Stovetop percolators differ from electric percolators due to the heat source difference. As the name suggests, electric percolators are plugged into an electricity source and start the process. With a stovetop, you have the control to choose the temperature of your brew.

Electric Percolator
Electric percolators resemble traditional electric tea kettles, although they function differently. The heating element in the electric percolator uses electricity to warm up. You can regulate the temperature within the percolator on many electric percolators. Another feature that many modern percolators have is the automatic heat reduction of the brew to prevent it from being too hot to drink.
You can control your coffee’s bitterness and strength by paying attention to the length of time you brew. The longer you leave it on, the more cycles the coffee will go through. If you are not careful, it is easy to overdo it and make your coffee too intense or concentrated.
How Do You Use a Percolator?
The coffee percolating process is straightforward and is very easy once you do it a few times. The only things to watch out for are over-brewing your coffee or making your brew too hot. These mistakes can make your beverage too strong or too concentrated. For this reason, it is a good idea to pay close attention to what you are doing the first few times.
Grind Coffee Beans
If you wish to grind your coffee beans yourself, instead of buying pre-packaged coffee grounds or pods, there are a few ways to do it. You can grind your beans using machines or even manually, depending on what you have at your disposal. Setting your blender or food processor to medium-high and blending/pulsing will do the trick for a few seconds.
If you prefer to go off the grid, you can still grind your beans to perfection. If you have a mortar and pestle, you can make very fine grounds for your next brew. When grinding using a mortar, make sure that you do not overfill the mortar more than one-third of the capacity. This way, your beans will not fall out. You can also use a rolling pin and re-roll your beans until you reach the desired consistency.
Other grinding methods, such as using a hammer or a garlic presser, also work. Although these are unconventional and rather labor-intensive, you can still get the job done if you want to. Medium-coarse grounds work well in percolators. If you grind your beans too small, they may end up in your coffee.
Fill with Water
Once you have your beans ground to your desired consistency, fill the percolator reservoir with water. Use cold water, and add water based on how many coffee grounds you add. Cold water will help the percolation process and control the heat.
Boil
Before boiling, make sure that all the parts of your percolator are snug and in the right spot. Then, add your coffee grounds to the coffee basket and close the percolator. If you find yourself unsure about how many coffee grounds to add, stay on the lower side. If you add too many, you run the risk of making coffee that is too strong.
If you are using a stovetop percolator (Stovetop Percolator vs Moka Pot – What are the Differences?), put it on the stove before you turn the heat on. By doing this step before turning the heat up, you will slow the heating process, which will prevent scorching or over-boiling.
The water in your percolator is hot enough when you see it bubbling at the top of the kettle. Most percolators have see-through parts on the top to allow you to see the inside. If your water is boiling, which you do not want, turn down the heat a bit. A steady stream of bubbles is a telltale sign of boiling water. On the other hand, no bubbles mean your water is too cold.
For your first attempt at using a coffee percolator, the full process should take about eight to ten minutes. Of course, you can adjust this figure based on your personal preferences and what you learn from experience.
Final Thoughts on Perked Coffee
Coffee percolators are neat instruments that are very good at what they do: make coffee. These instruments make coffee by circulating hot water through the coffee grounds, rather than drip or steeping devices. There are two major coffee percolator types: stovetop and electric. Both use the same process to make coffee and only differ in the heat source and configuration.
When making coffee using a percolator, it is essential to pay attention to how long you percolate. Too long and your coffee will be bitter; too short and your coffee will not resemble coffee. The heat of the water you use is also essential, which you can gauge how many bubbles are in the water. You will inevitably learn lessons along the path of your coffee percolator journey, a journey well worth the time.
