To so many of us, coffee is a crucial part of our day. It gives us that needed boost of energy, helps us concentrate and increase our alertness, and is high in antioxidants as well.


It also just happens to taste so good!
That’s why plenty of coffee drinkers want to have a source of this hot brew at home. Add to that the fact that some coffee shops can be needlessly overpriced, and that some of us enjoy food and drink that are homemade.
Other times, the ready-made coffee we buy just isn’t that good.
This is where a stovetop percolator comes in. Sure, they may be looked at as a bit old-fashioned, but at times the old school has its own charm.
Let’s explore how to make coffee with a stovetop percolator for a good cup of joe that’s classic and robust.
What’s a Stovetop Percolator?
Never heard of them? That’s okay. Most of us are used to drip coffee-makers and espresso machines, just like electric tea kettles and stoves.
So what is a stovetop percolator, and how does it work?
What Is It?
A stovetop percolator is a device that brews coffee using the old-fashioned way, that is by using fire to boil the water.
Percolators come in two variations: the gravity percolator and the pressure percolator. Let’s go through how they differ.
How Does It Work?
A gravity percolator is the more common option of the two, and it’s the one we’ve written this guide about.
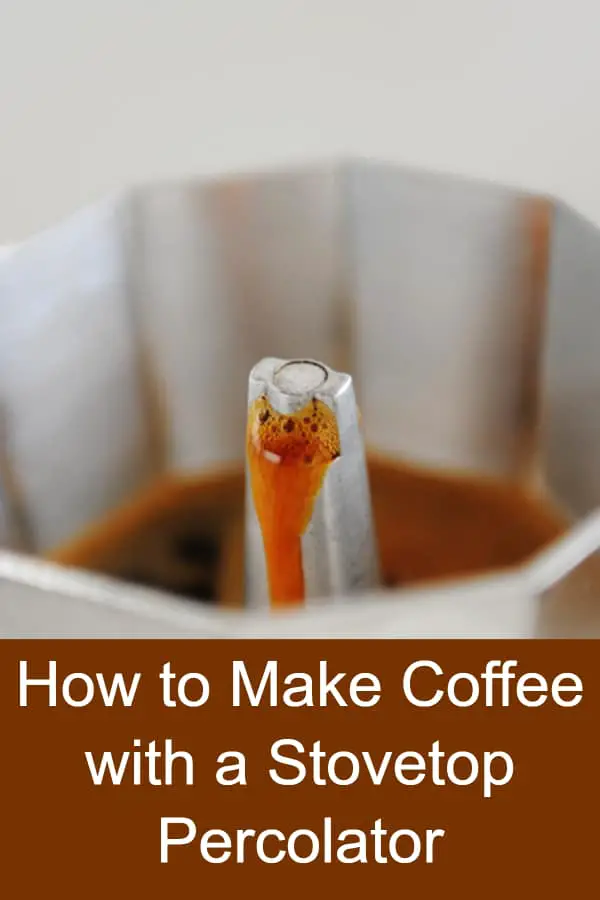
It works by sending up streams of boiling water and allowing them to fall on coffee grounds, which lie on a sieve. The water then falls from the top of the percolator, drenching the coffee grounds in the sieve. Then, it falls through the sieve and goes back up again to repeat the process.
This process is repeated several times and is the reason why percolators get their reputation for producing strong-flavored coffee.
Pressure percolators, on the other hand, are actually called Moka pots.
They use a similar technique to the gravity percolator, except the pressure percolator, or stainless steel or aluminum Moka pot, uses both steam and water pressure to push the water through the coffee grounds, while gravity percolators depend on gravity to do the job, hence the name.
The main difference between the two is their end result. While Moka pots are used to make more espresso-like drinks that are concentrated and heavy, gravity percolators are meant for regular-type coffee that you can alter to your liking.
What Does It Taste Like?
There’s a reason why stovetop percolators are adored by experienced coffee aficionados.
Percolator-made coffee is typically stronger than your average cup of brew due to the repeated brewing method. It’s not that it tastes more bitter per se, but it’s more frequently described as robust and deep.
If you ever find yourself in a discussion about stovetop percolators, you’re bound to hear someone complain of its bitter and acidic results of the perked coffee. But that doesn’t have to be the case as percolated coffee can be strong and delicious.

Is It More Bitter?
Not necessarily. The longer you let the water boil, the more bitter the coffee will taste.
Is It Typically Stronger?
Stovetop coffee is not as concentrated as an espresso, but it’s still stronger than your average cup of joe.
In fact, how well you brew your coffee using your percolator directly affects the end result. To make sure you avoid the taste of scorched and acidic coffee (Can you get Acid-free Coffee?), you have to be watchful while measuring your ingredients and keeping an eye on the percolator when you brew your pot of perked coffee.
But it’s easier than it sounds! Keep reading as we’ll give you a step-by-step guide on the brewing process.
If you want to check out some percolators online, the Farberware 50124 and the Cook N Home 8-Cup percolators are a couple of the best-rated ones in 2020.
How to Grind the Coffee beans?
Because of the way stovetop percolators are built, it’s best to avoid grinding your coffee too finely. Instead, use coarsely ground coffee beans.
This is because every stovetop percolator has a different diameter of holes in the filter basket. If you don’t use coarse coffee grounds and instead choose grounds on the finer side, the coffee grains will end up in your final cup of coffee, spoiling it and the experience.
Some of the most popular coffee bean brands today include Lavazza and Coffee Bros.
How to Make Coffee Using a Stovetop Percolator
We mentioned earlier a step-by-step guide on how to use a stovetop percolator to make a good cup of coffee. Here, we’re going to cover the tools you’ll need, as well as what you need to do and watch out for.
Let’s get started!
What You’ll Need
It seems like anything that isn’t exactly modern can be seen as unnecessary. This sentiment might make brewing coffee on a stovetop seem like a hassle, but it’s actually far from it.
It’s an easy process. You’ll only need a few things to get you started:
- Coffee beans
- Grinder (if you don’t use store-bought coffee grounds)
- Measuring spoon
- Water
- Percolator
- Stove
How Much Coffee Is Enough?
How you measure your coffee depends on how you like it. Do you like it gentle and sweet, or more on the sharp and flavorful side?
If you want the former, you should choose one teaspoon of coffee per cup (How many grams of coffee beans per cup?). If you want the latter, then you should go for one tablespoon of coffee for each cup of water.
If you’re trying this for the very first time, you may want to experiment a little with the amounts of coffee you use to get the taste just right.
Time to Grind
You don’t want to start on the percolator when your coffee beans are still whole.
If you buy your coffee pre-ground, you only need to look for the “coarse” label. If you have options, a medium-coarse grind should serve you well.
If you grind your own coffee, it’s always best to have the right equipment. Coffee grinders are versatile, but with a stovetop percolator, you need one that gives you options.
The two most common types of grinders are burr grinders and blade grinders.
A blade grinder looks like a blender because it comes with a blade in the center of the grinder that looks similar to a propeller.
Burr grinders are made up of two harsh revolving surfaces called “burrs”. These burrs grind the coffee between them, only a small handful of beans at a time.
This causes burr grinders to give you more control over your final product because the beans are ground a few beans at a time, ensuring that they’re the same size.
When grinding your coffee at home using a burr or blade grinder, opt for the “coarse” or “medium-coarse” option, depending on what’s available.
Fill ‘Em Up
This is the simplest step of all! All you need to know is that most percolators hold up to about 4-8 cups of water. Most packaging also gives the exact measurements your percolator can take.
As for filling the percolator, it’s as simple as opening the top lid and pouring in your desired amount of water.
Fresh coffee is always the preferred option, so it’s best to prepare only the amount you’re planning to drink. Avoid making coffee to drink later.
Your percolator may be built differently. If so, you may need to remove the upper “basket” that contains the coffee grounds during the brewing process in order to reach the water tank.
How Hot Is Too Hot?
Water temperature can make or break your coffee, which is why you need to keep a watchful eye on your stove percolator as the water comes to a boil.
The key explanation of why stovetop percolators usually end up producing bitter coffee is because excessive heat causes the brewed coffee to recirculate during the brewing process. This causes the coffee to over-brew, making it taste salty and acidic with an unpleasant aftertaste.
For this reason, percolators are designed with glass indicators that allow you to see the status of the water. These come in very handy when brewing your coffee.
The ideal temperature for brewing coffee using a percolator is between 195 to 200 F, or 90 C – Coffee percolator vs drip coffee makers.
And here’s an extra tip for an even better cup of joe! For smoother and finer tasting coffee made with your percolator, it’s recommended that you use filtered or even distilled water. The cleaner the water, the clearer and unspoiled the coffee comes out.
What s in a Macchiato? – Can you make it with a Percolator?
The Key to a Good Brew
A lot of things about the stovetop percolator process depend on how you like your coffee, which is great because you have control over everything.
The brewing duration is yet another factor that affects the taste of your coffee. Simply put, the longer you let the water boil, the stronger your coffee will be.
However, keep in mind that the golden rule of a percolator brew is five minutes after the water nears boiling. That’s why it’s always best to have a timer set next to you.
After you notice through the glass indicator that the water bubbles are appearing more and more frequently, leave it for a few seconds and lower the heat.
When the timer is done, check on the water to see if it’s turned into the coffee you want. If not, leave it for another minute or two and check again.
Once you’ve reached the color you want, turn the heat off completely and proceed to remove the coffee grounds.
Pour your coffee and add sugar, and milk or cream, and enjoy!
Easy to Clean
How great is it that the most daunting step is actually the easiest? You’ll be happy to know that stovetop percolators are not just affordable, but they’re also very easy to clean.
All you need to do is remove the top basket where the coffee is placed and rinse it before doing the same with the rest of the pot.
Easy, right?
Things to Consider
Depending on who you talk to or ask for advice about stovetop percolators, the answer you’ll receive will depend on their experience and quite honestly, whether they gave them a chance or not!
That’s why we’re going to point you towards some things to consider if you’re questioning the effectiveness of stovetop percolators.
- They’re more affordable than electric percolators, drip coffee-makers, and espresso machines
- They’re easier to disassemble and clean
- They offer more control over flavor
- They’re cheaper than buying ready-made coffee
FAQs
How many cups does a percolator serve?
This depends on the size of the percolator, but most of them usually serve seven to eight cups.
Can I clean a percolator using a dishwasher?
Yes, most percolators are dishwasher-friendly. However, it’s best to check the instructions they come with to avoid any damage.
Can you leave the coffee basket in after brewing?
It’s best not to. Leaving the coffee basket inside the percolator will cause coffee grounds to fall into your finished cup of coffee. It’s also best to clean them after every use.
Does a percolator work on any type of stovetop?
Yes, it doesn’t matter whether you’re using a gas or electric stove. The only important thing to note is to make sure there’s adequate heat reaching the percolator.
Should you use filters?
You can use coffee filters to better drain the final product, but it’s not necessary because the machine already comes with a coffee basket. An external filter is also used because some say they help make the filter basket non-stick. This is debatable and depends on preference.
Final Thoughts
Coffee is often looked at as a means to kickstart the day, and that’s true.
But to a lot of true coffee enthusiasts, it’s genuinely an enjoyable part of their day.
With a stovetop percolator, you get full control of classic flavors that you can make at home, and they’re also much cheaper than the usual drip coffee-makers or Espresso machines, which don’t offer the same amount of control!
Stovetop percolators work well for anyone who’s particular about their coffee, those who believe in the phrase “old is gold,” and campers on a trip with no electricity!
So if you do choose a stovetop percolator, take pride in your old-school and delicious approach to life, and enjoy that cuppa!